Hiflylabs Analytics Engineering Handbook
![]()

This is a collection of standards and tips for practicing Analytics Engineering craftsmanship at Hiflylabs.
The deployed Handbook is available here, checkout the Awesome dbt repository for additional resources.
Contribute to this repo
Have something to add? We'd love to hear it! Check out our contribution guide here.
🛠️ Dev Tools
We recommend using VS Code if you don't currently have a preference.
VSCode plugins
Make sure you check in the util readme if you need to configure IDE settings to make them work!
- Power User for dbt Note: Make sure that you set the extension version to 0.46.0
- Rainbow CSV
- GitLens
- Better Jinja
- Find Related Files
- GitHub Pull Requests and Issues
- Todo Tree
- YAML
- Copy file name
- Code Spell Checker
- Data Wrangler
Specific configurations (to be added in the settings.json of VS Code)
The following will remap Markdown, Yaml and SQL files to use the Jinja-flavoured interpreter:
    "files.associations":{
        "*.md": "jinja-md",
        "*.yml": "jinja-yaml",
        "*.sql": "jinja-sql",
    },
The following will configure Related Files rules for raw / compiled models:
"findrelated.rulesets": [
        {
            "name": "sql",
            "rules": [
                {
                    "pattern": "^(.*/)?models/(.*/)?(.+\\.sql)$",
                    "locators": [
                        "**/compiled/**/$3"
                    ]
                },
                {
                    "pattern": "^(.*/)?compiled/(.*/)?(.+\\.sql)$",
                    "locators": [
                        "**/run/**/$3"
                    ]
                },
                {
                    "pattern": "^(.*/)?run/(.*/)?(.+\\.sql)$",
                    "locators": [
                        "**/models/**/$3"
                    ]
                }
            ]
        }
    ],
The following will configure spacing/indentation rules to follow the style guide:
    "[yaml]": {
        "editor.insertSpaces": true,
        "editor.tabSize": 2
    },
    "[sql]": {
        "editor.insertSpaces": true,
        "editor.tabSize": 4
    },
    "[jinja-yaml]": {
        "editor.insertSpaces": true,
        "editor.tabSize": 2
    },
    "[jinja-sql]": {
        "editor.insertSpaces": true,
        "editor.tabSize": 4
    },
    "editor.detectIndentation": false,
    "editor.rulers": [
        { "column": 80, "color": "#403558" }
    ],
The following will disable SQL syntax highlight for the files under the target/ directory:
"files.associations": {
        "**/target/**/**/*.sql": "plaintext"
    }
Terminal Hacks
Run only the locally modified(checked into version control) dbt models
To setup add this to your .bashrc/.zshrc
function dbt_run_changed() {
    children=$1
    models=$(git diff --name-only | grep '\.sql$' | awk -F '/' '{ print $NF }' | sed "s/\.sql$/${children}/g" | tr '\n' ' ')
    echo "Running models: ${models}"
    dbt run --models $models
}
### Run only the locally staged(into version control) dbt models
``````bash
dbt_run_staged_changed () {
        children=$1
        models=$(git diff --name-only --cached | grep '\.sql$' | awk -F '/' '{ print $NF }' | sed "s/\.sql$/${children}/g" | tr '\n' ' ')
        echo "Running models: ${models}"
        dbt run --models $models
}
Interactive dbt model search - a command line finder for dbt models
To setup add this to your .bashrc/.zshrc
FZF_DBT_PATH=~/.fzf-dbt/fzf-dbt.sh
if [[ ! -f $FZF_DBT_PATH ]]; then
    FZF_DBT_DIR=$(dirname $FZF_DBT_PATH)
    print -P "%F{green}Installing fzf-dbt into $FZF_DBT_DIR%f"
    mkdir -p $FZF_DBT_DIR
    command curl -L https://raw.githubusercontent.com/Infused-Insight/fzf-dbt/main/src/fzf_dbt.sh > $FZF_DBT_PATH && \
        print -P "%F{green}Installation successful.%f" || \
        print -P "%F{red}The download has failed.%f"
fi

export FZF_DBT_PREVIEW_CMD="cat {}"
export FZF_DBT_HEIGHT=80%
source $FZF_DBT_PATH
Local notification
To get sound notification after a long running dbt command has finished
dbt run && say beep
Disable tracking
To disable Anonymous usage stats set the following configuration in your dbt_project.yml
flags:
  send_anonymous_usage_stats: false
For more, do regularly check our awesome-dbt
🏗️ How we structure and style our projects
We follow the Matt Mazur SQL style guide and the one by Fishtown Analytics for dbt-specific behaviors.
We also follow the best practices documented on the dbt website.
We LOVE CTEs, we don’t use subqueries!
We LOVE trailing commas!
Find a good project checklist here
Other great resources to check out
- How we structure our dbt projects
- How we configure Snowflake
- The Ultimate Guide to Using dbt With Snowflake
- Snowflake-Terraform-bootstrap project
- How to set up a dbt data-ops workflow, using dbt cloud and Snowflake
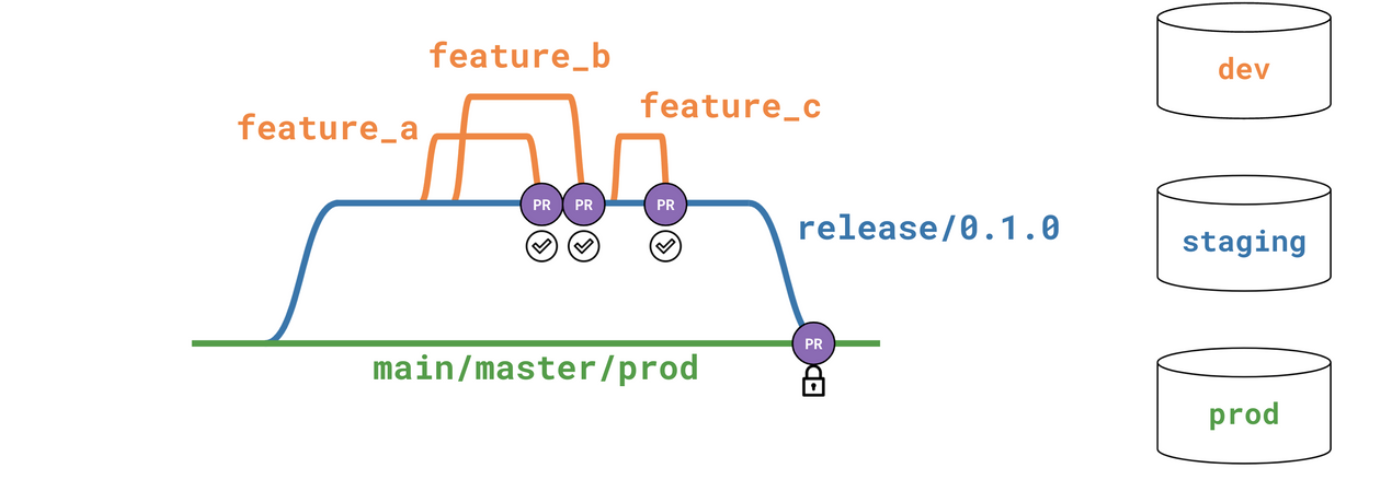
🎋 Branching
For branching we use the git flow branching model.
- main: reflects the production state of the project.
- dev/staging: includes the features contained before a release (= merge to the main production branch).
- feature/name: holding atomic changes to the project and to be merged into the development branch via separate peer-reviewed PRs.
👩⚖️ Main rules:
- Each feature branch/PR should represent one logical piece of work
- Make sure commits are related to the pull request and look clean
- Always perform pull before commit and push
- Do a git pull before you start working
- Regularly synchronize your local repos to the remote one
- Always create branches from the
devbranch - Try to minimize the time between creating a new branch and opening a PR
- By convention, name branches as feature/<branch_name> or fix/<branch_name> preferably containing a ID referencing a ticket of somesort
- Small independent fixes or bulk tests/docs can go into one branch
- Make sure that you don't forget to delete your feature branch after the PR has been merged
Submitting a PR: Feature PRs must be submitted to the development branch, and new releases occur when a PR is submitted from development to main. Every PR submission should follow the same template guidelines automatically provided when opening a PR.
It should consist
- a short description around the purpose of the request,
- the assigned JIRA ticket (if applicable),
- the changes made in bullet points,
- affected/introduced models
Merging
PRs should be reviewed by other developers and (or) project maintainers, preferably having enough information on what's the issue it solves, or what feature we are planning to implement with the underlying change. Also implemented changes should be frequently checked with business requirements to make sure that it brings the desired change.
PRs all-around the project should be the core responsibility of the project maintainer. Someone who oversees the business logic and can prioritize between developer tickets created for the sprint. Feature developers must ensure that the source branch does not have any conflict with the target branch. Upon merging a feature to development, the feature branch should be purged from the remote repository.
🌡️ Hotfixes:
Hotfixes to the main branch can be developed and integrated in one of the two following ways:
As a standard modification via the development branch. Since deploys are planned to be fairly frequent, many hotfixes may wait until the next scheduled release (in many cases a few days or less).
If the hotfix is very urgent, the following steps are required:
- Branch the hotfix off the main branch. Hotfix branch name should be prefixed with hotfix/.
- Make the changes and test them in your own dev environment.
- Create a PR.
- When the PR is submitted, the CI job will be triggered. Let it run. Make note of the errors it may create.
- Have somebody else to merge the PR. In these pressing situations it is even more important to have your work reviewed.
- Coordinate with business users on the most appropriate time to make the new/fixed data available.
- At such time, upon the successful PR test and merge, run the daily job..
PR Template
Copy this below into .github/pull_request_template.md:
📐 Pre-commit
Installation
pip3 install pre-commit
We are mainly using the following four repos:
Configuration
Add to project/.pre-commit-config.yaml
repos:
- repo: https://github.com/Montreal-Analytics/dbt-gloss
  rev: v1.0.0
  hooks:
  - id: check-script-semicolon
  - id: check-script-has-no-table-name
  - id: dbt-test
  - id: dbt-docs-generate
  - id: check-model-has-all-columns
    name: Check columns - core
    files: ^models/core
  - id: check-model-has-all-columns
    name: Check columns - mart
    files: ^models/mart
  - id: check-model-columns-have-desc
    files: ^models/mart
Initialization
pre-commit install
🪡 CI/CD
Standard Approach
To setup a the Github integration, you have to have an admin account on the Github repository. This is because you need to add a webhook to the repository. This webhook will trigger the CI pipeline when a new commit is pushed to the repository.
Find the official documentation here
ZCC CI
The zero-copy-clone CI creates a mirror environment of the target database and builds the models in that environment, ensuring that there are no missing external references in the environment.
Original idea from here
{% macro clone_prod_update_permissions(db, clone_db, role, schemas_to_clone) -%}

    {{ log("Cloning database " ~ db ~ " to " ~ clone_db, info=True) }}

    {{ log("The following schemas will be cloned: " ~ schemas_to_clone, info=True)}}

    {% call statement(name, fetch_result=True) %}

        DROP DATABASE IF EXISTS {{clone_db}};
        CREATE DATABASE {{clone_db}};
        {% for schema_name in schemas_to_clone %}
            {% if '_' in schema_name %}
                {% set custom = schema_name.split('_')[1] %}
                create schema {{target.schema}}_{{custom}} clone {{db}}.{{schema_name}};
            {% else %}
                create schema {{target.schema}} clone {{db}}.{{schema_name}};
            {% endif %}
        {% endfor %}
        GRANT ALL ON DATABASE {{clone_db}} TO ROLE {{role}};

        {# grant access for debugging #}
        GRANT USAGE ON DATABASE {{clone_db}} TO ROLE TRANSFORMER;

    {% endcall %}

    {{ log("Database cloning completed!", info=True) }}

{%- endmacro %}

{% macro pr_clone_pre_hook() %}

    {% if target.name == "dev_pr" %}

        {# If it is a PR from the feature bracnh against development, then clone the ANALYTICS_DEV #}
         {{ clone_prod_update_permissions(var('dev_db'), var('development_clone_db'), var('clone_role'), var('schemas_to_clone')) }}

    {% elif target.name == "prod_pr" %}

        {# If it is a PR from the development against main, then clone the ANALYTICS_PROD #}
        {{ clone_prod_update_permissions(var('prod_db'), var('production_clone_db'), var('clone_role'), var('schemas_to_clone')) }}

    {% else %}

        {{ log(target.name ~" is not meant to be used for PR testing", info=True) }}

    {% endif %}

{% endmacro %}
Add these to your dbt_project.yml file
vars:
# Databases
  "dev_db" : "ANALYTICS_DEV"
  "prod_db" : "ANALYTICS_PROD"
  "production_clone_db" : "ANALYTICS_PROD_CLONE"
  "development_clone_db" : "ANALYTICS_DEV_CLONE"
  # Roles
  "clone_role" : "SYSADMIN"
  # Schemas to clone
  "schemas_to_clone" : ["ANALYTICS", "ANALYTICS_STAGING", "ANALYTICS_SEED", "ANALYTICS_RAW_SAMPLE"]
N.B. Note that this can cause discrepancies if you run multiple PR as they can overwrite each other. This is why we recommend to test PRs one by one with this solution. The future implementation would create custom clone databases for each PR.
Linters
The following article is a good starting point to learn about the SQL style used by most dbt projects:
https://docs.getdbt.com/best-practices/how-we-style/2-how-we-style-our-sql
The linting/formatting tools available in dbt cloud are outlined in this article https://docs.getdbt.com/docs/cloud/dbt-cloud-ide/lint-format
We prefer to use SQLFluff because it offers more customization options than sqlfmt. There are plenty of other SQL formatting options, but for interoperabilty with users using dbt cloud it is preferred to use the tools available there.
For dbt-core + vscode development environment the following extension is recommended: https://marketplace.visualstudio.com/items?itemName=dorzey.vscode-sqlfluff Follow the dbt setup instructions in the above link.
SQLFluff configurations
Place the following in a file named .sqlfluff in the root of your dbt project
replace
[sqlfluff]
dialect = <dbengine>
templater = dbt
runaway_limit = 10
max_line_length = 120
indent_unit = space

[sqlfluff:templater:jinja]
apply_dbt_builtins = True

[sqlfluff:indentation]
tab_space_size = 4
indented_using_on = False
allow_implicit_indents = True

[sqlfluff:layout:type:comma]
spacing_before = touch
line_position = trailing

[sqlfluff:rules:capitalisation.keywords]
capitalisation_policy = lower

[sqlfluff:rules:aliasing.table]
aliasing = explicit

[sqlfluff:rules:aliasing.column]
aliasing = explicit

[sqlfluff:rules:aliasing.expression]
allow_scalar = False

[sqlfluff:rules:capitalisation.identifiers]
extended_capitalisation_policy = lower

[sqlfluff:rules:capitalisation.functions]
capitalisation_policy = lower

[sqlfluff:rules:capitalisation.literals]
capitalisation_policy = lower

[sqlfluff:rules:ambiguous.column_references]  # Number in group by
group_by_and_order_by_style = consistent
Managing YML configurations
- dbt package: dbt-codegen
- pip module: dbt-osmosis
dbt-codegen
What is dbt-codegen
It is a dbt packages containing macros for generating basic yaml files and dbt models. The macros can be used from a terminal by running the dbt run-operation <macro_name> --args '{"<key>": "<value>"}' command.
Main features
- Generate source yaml files based on the database schema (
generate_source) - Generate base models (select + rename) (
generate_base_model,base_model_creation) - Generate model yaml files based on the corresponding database object (
generate_model_yaml) - Generate boilerplate sql for importing referenced models as CTEs (
generate_model_import_ctes)
Usage note
- Calling the macros using the
dbt run-operationcommand will output the result to the terminal, you have to manually create the corresponding yaml files and then copy (or pipe) the generated content into them - Using the
generate_model_yamlmacro, columns can inherit their description from upstream models (when the column name is matching with the upstream column)
dbt-osmosis
What is dbt-osmosis
It is a python based tool that can be used for automated yaml file generation and management, it can speed up development, automate documentation maintenance and ensure consistency across your dbt project.
Main features
- Create yaml files for undocumented sources or models
- Move and merge yaml files based on the configuration
- Add or remove columns based on the corresponding database object
- Order columns or models in yaml files based on configured rules
- Inherit tags, descriptions and meta fields from upstream columns (based on matching column names)
- Directly compile or run jinja SQL snippets (workbench - Streamlit application, REPL like environment to run dbt models against your database)
Usage notes
- Configuration is written into the
dbt_project.ymlfile- For sources, it can be defined under
vars.dbt-osmosis.sources - For models, using the
+dbt-osmosisand+dbt-osmosis-optionskeys undermodels.<dbt project name>
- For sources, it can be defined under
- The yaml file management strategy is highly configurable (eg. one file per model / folder, file name, file path)
- It can be run on-demand from a terminal or in an automated way as a pre-commit hook or part of the CI pipeline
dbt-codegen vs dbt-osmosis
| dbt-codegen | dbt-osmosis |
|---|---|
| manual usage | manual or automated usage |
| creates text output, doesn't modify or manage files | creates and modifies yaml files |
| config passed as arguments in the terminal | config saved into dbt_project.yml |
🧰 Troubleshooting
General
To debug an error, consult first the documentation.
dbt-osmosis
This is a must have to preview model excerpts and test out blocks of a complex logic causing a test to fail or wrong data in the output.
Repo here
Store Test Failures
We are able to write test failures and warnings directly into our datawarehouse. It helps in identifying records responisble for the anomaly.
Add to dbt_project.yml
Optional schema parameter will store audit tables in target.schema_audit schema
tests:
  +store_failures: true
  +schema: 'audit'
For more check out the official documentation
🛳️ Deployment
Our goal is to keep an isolated environment for testing out new features before pushing it to production.
This is called as blue-green deployment. See more here.
❄️ Snowflake
🟦🟩 Blue/green deployment
References:
⚠️ Warning! If you want to keep using incremental build, go with production rollback 👇 instead!
As former production tables get demoted to staging via the swap feature, the next incremental load will build on top of obsolete tables in staging before swapping.
Imagine:
- T: Imagine that our run fully refreshes the data in staging, then swaps it with the production database in T-1
- T+1: A new production cycle is due, but only certain data sources have to be processed again, so you decide to go with an incremental refresh.
- T+1: You then wonder why all the information we updated in T is missing?
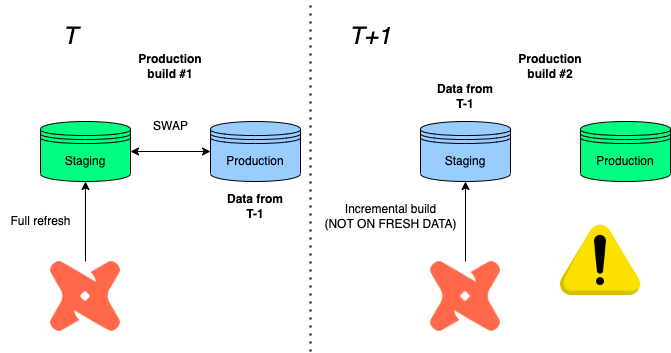
Well, since we built on top of a production data in T-1 before swapping again, the information loss is the difference between staging and production in T!
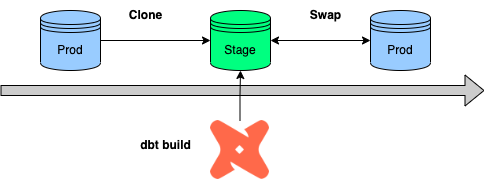
🧻 Production rollback
Instead of swapping databases, (1) we copy the previous production data to a staging environment, (2) rebuild the tables under scope, then (3) clone it back to production.
This also works with incremental models, because we always clone back the latest production loading before building on top of it.
🔍 BigQuery
Unfortunately, swapping is only available in Snowflake, so the idea is to run & test all models before loading it to the production environment instead.
This is called WAP (Write-Audit-Publish). Read more about this here.
BigQuery is not able to able to rename datasets, therefore, swapping by renaming with subsequent commits is ruled out.
WAP (Write-Audit-Publish)
This is a classical approach mentioned by the deck linked above.
- Builds all in an audit staging dataset
- Then, build only top level models under the activation (BI) layer in prod again.
- Traffic is stopped if the build failed in the audit environment.

Here's the macro to implement it:
{% macro generate_schema_name_for_env(custom_schema_name=none) -%}

{%- set default_schema = target.schema -%}

    {%- if custom_schema_name is not none -%}
        {%- if custom_schema_name not in ("staging", "intermediate") and
        "audit" in target.name -%}
        unaudited
        {%- else -%}
        {{ custom_schema_name | trim }}
        {%- endif -%}
    {%- else -%}
        {{ default_schema }}
    {%- endif -%}

{%- endmacro %}

{% macro generate_schema_name(schema_name, node) -%}
    {{ generate_schema_name_for_env(schema_name) }}
{%- endmacro %
Add tags to mart (top) layer (or separate folder structure)
models:
  mart:
    +tags: ['mart']
dbt Cloud job
#build it in an audit dataset
dbt run --target prod_audit
dbt test --target prod_audit

#recreate top-layer in production with tags
dbt run --target prod -s tag:mart
#or with path
dbt run --target prod -s mart.*
WAC (Write-Audit-Clone)
One thing which helps us move forward is that BigQuery also has now a Table Clone feature.
What we can do is to use the production job to load to the data to a new dataset e.g. analytics_stage and clone the top-level tables with the mart tag to analytics_prod.

Please do review the code below before copy-pasting as it can be specific to a use-case!
{% macro has_intersect(set1, set2) %}

    --check if the two sets have intersection
    {% for item in set1 %}
        {% if item in set2 %}
           {{ return(True) }}
        {% endif %}
    {% endfor %}
    {{ return(False) }}

{% endmacro %}

{% macro write_audit_publish() %}

{#
    EXPECTED BEHAVIOR:
      1. Loads every table to a single dataset (this requires using a different target name than 'prod')
      2. Gatheres all the model/table names maching with the supplied tags
      3. We redistribute the tables to the correct datasets in production depending on the tag (=dataset)

#}

{% if target.name == 'staging' %}

    {{ dbt_utils.log_info("Gathering tables to clone from...") }}

    {% set tables = dict() %}

    {% set tags_to_clone = var('tags_to_clone') %}

    -- create empty dictionary for table-tag mapping
    {% for model in graph.nodes.values() %}

        -- clone only intersectrions and tables
        {%- if has_intersect(tags_to_clone, model.tags) and model.config.materialized == 'table' %}

            {% if model.schema not in tables.keys() %}

                {% do tables.update({model.tags: []}) %}

            {% endif %}

            {% do tables[model.tags].append(model.name) %}

        {% endif %}

    {% endfor %}

    {{ dbt_utils.log_info("Cloning in progress...") }}

    -- iterate through all the tables and clone them over to chosen destination
    {% for key, value in tables.items() %}

        -- create prod schema if not exists
        {% set sql -%}
            create schema if not exists {{ key }};
        {%- endset %}

        {% do run_query(sql) %}

        {% for item in value %}

            {% call statement(name, fetch_result=true) %}

                -- copy from single analytics_staging schema but distribute to different schemas in prod
                create or replace table
                {{ target.project }}.{{ key }}.{{ item }}
                clone {{ target.project }}.{{ target.dataset }}.{{ item }};

            {% endcall %}

        {% endfor %}

        {{ dbt_utils.log_info("Tables cloned successfully!") }}

    {% endfor %}

{% else %}

{{ dbt_utils.log_info("WAP is only supported on staging! Process skipped...") }}

{% endif %}

{% endmacro %}
Cloned tags are driven by the tags_to_clone variable:
vars:
  tags_to_clone: ['mart', 'utils']
Then in dbt Cloud, the process would be:
- builds all in the staging (pre-prod) dataset
- copies all tables over to prod with the macro
#build it in analytics_staging
dbt seed
dbt run
dbt test

#copy mart layer to analytics
dbt run-operation write_audit_publish
Limitations:
- We can’t copy views — no problem because we don’t have those
- Additional storage cost incurred on the difference between clones and source tables
🪞 Mirror Layer
Time and time again, we stumble into data integration issues because we are still dependent on third-party data submissions. Put simply, if source shares/servers are not live, we are not able to run our end-to-end jobs or certain tables are empty.
Another way to overcome that is instead of creating is that we create a layer at the bottom just before staging.
Structurally, the project would be extended with a raw layer which copies the source tables 1:1:

with source as (

    select * from {{ source('name', 'table') }}

),
This layer then would be separated from the dev/production main build job and refreshed manually when needed.
dbt Cloud job:
#build it from staging
dbt build staging.*+
🧪 Testing
📦 Useful packages
‼️ Non-negotiables
Primary (surrogate) keys should always be:
- unique
- not null
Referential integrity tests:
models:
  - name: model_name
    columns:
      - name: pk
        tests:
          - dbt_utils.relationships_where:
              to: ref('other_model_name')
              field: client_pk
Currencies have to be the same for all transactions.
models:
  - name: transactions
    description: Interface table for transactions (payments)
        - name: currency
        tests:
            - not_null
            - accepted_values:
                values: ['USD']
Monetary, quanity values should be non-negative
models:
  - name: spending
    description: Spending table
    columns:
      - name: spend
        tests:
          - not_null
          - dbt_utils.accepted_range:
              min_value: 0
              inclusive: true
Date field can't be in the future (there can be special cases!)
models:
  - name: model_name
    tests:
      - dbt_utils.expression_is_true:
          expression: "created_at <= CURRENT_TIMESTAMP"
TODO: add more examples/conventions
☁️ dbt Cloud Setup
Set up defer build
:warning: Warning! You have to be a repository owner to set up the integration between Github and dbt Cloud!
Extensions
Raycast (Mac only)
Paradime.io
Github Action to verify paradime schedules.
Invalid paradime schedule.yml configurations could break Bolt configuration. Therefore we validate the schedule configurations.
name: Check paradime_schedule.yml Changes

# Trigger the workflow when code is pushed to any branch
on:
  push:
    paths:
      - paradime_schedules.yml

jobs:
  run_script:
    runs-on: ubuntu-latest

    steps:
      - name: Checkout repository
        uses: actions/checkout@v3

      - name: Set up Python
        uses: actions/setup-python@v4
        with:
          python-version: '3.11.6'

      - name: Install Paradime CLI
        run: |
          python -m pip install --upgrade pip
          pip install paradime-io==4.6.1
      - name: Verify Schedule
        run: |
          paradime bolt verify
💰 Cost Monitoring
🥡 Out-of-the-box
There are built-in cost monitoring solutions in BI tools as well but they are not parsing the manifest.json, only checks warehouse metrics.
Looker - Snowflake Cost and Usage
Simplified (in-house) Artifacts
📊 How to set up Snowflake resource monitoring:
- First, accountadmins should enable notifications
- Use the ACCOUNTADMIN system role. If you aren’t, in the drop-down menu next to your name in the upper-right corner, select Switch role » ACCOUNTADMIN.
- In the same drop-down menu, select Preferences » Notifications. Select one of the options.
You have to create the resource monitor first, then assign it to (multiple) warehouses.
- Notify: sends mail
- Suspend: stops the warehouse after queries have finished
- Suspend immediately: stops all processes immediately
To create an account-level resource monitor that starts immediately (based on the current timestamp), resets monthly on the same day, has no end date or time, and suspends the assigned warehouse when the used credits reach 100% of the quota:
(you can also go beyond 100% when defining the resource monitor)
use role accountadmin;

create or replace resource monitor limit1 with credit_quota=1000
    frequency = monthly
    start_timestamp = immediately
    triggers on 100 percent do suspend;
alter warehouse wh1 set resource_monitor = limit1;
To create a resource monitor that starts at a specific date and time in the future, resets weekly on the same day, has no end date or time, and performs two different suspend actions at different thresholds:
use role accountadmin;

create or replace resource monitor limit1 with credit_quota=2000
    frequency = weekly
    start_timestamp = '<your-ts> PST'
    triggers on 60 percent do notify
             on 80 percent do suspend
             on 100 percent do suspend_immediate;

alter warehouse wh1 set resource_monitor = limit1;
Platforms
❄️ Snowflake
🔧 Setup → Configure Snowflake connection, authentication and dbt integration
🏗️ Architecture Overview → Snowflake’s key concepts and main components at a high level
💾 Storage → Understand table types, data protection features and storage cost management
⚙️ Compute → How warehouses, threads and clustering work, and how to optimize for performance and cost, including SQL features and monitoring
🧩 Special SQL Features → Unique Snowflake SQL functions
🔎 Monitoring & Debugging → In-house or third-party tools and techniques to track performance
🔧 Setup
Setting up dbt with Snowflake:
Authentication options:
- This is the recommended method for authenticating into Snowflake when using dbt
- It provides a secure setup suitable for automated workflows without requiring additional logins
- To avoid push notifications for every model build, ensure the
ALLOW_CLIENT_MFA_CACHINGparameter is set toTRUEat the account level when using user-password MFA - Snowflake also supports other TOTP-based MFA methods (e.g. Google Authenticator). While suitable for one-time logins, they are not compatible with running dbt models
🏗️ Architecture Overview
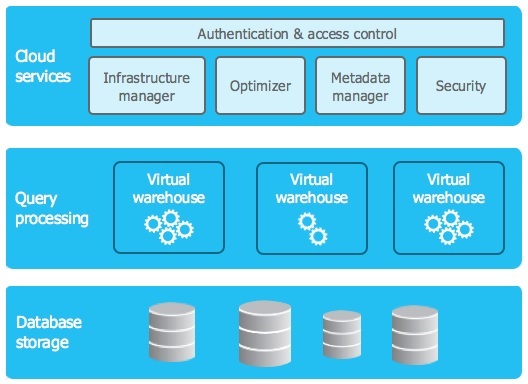
Snowflake’s architecture separates the following core components:
-
Storage: Scalable, fully-managed object storage layer. All your data (tables, staged files, etc.) lives here. Storage costs depend on data volume and retention features (time tavel, fail-safe).
-
Compute (Virtual Warehouses): On-demand compute clusters that execute your queries. You control their size, concurrency and auto-suspend settings. Compute is the biggest cost driver in typical workflows.
-
Cloud Services: Manages metadata, authentication and access control. Usually free unless it exceeds 10% of your compute usage.
-
Serverless Compute: Optional, Snowflake-managed compute for specific features like:
- Search Optimization Service (SOS)
- Query Acceleration Service (QAS)
- Tasks and Dynamic Tables
- ...and other serverless features
Key concept: Storage and compute scale independently. You only pay for the compute resources (credits) you actually use, while storage is billed separately.
More info: Key Concepts & Architecture
💾 Storage
This section covers how data is stored, protected and managed in Snowflake, including table types, data retention and other advanced features.
📋 Overview
- 🛡️ Table Types → Permanent vs. Transient tables and best practices for dbt
- 🗄️ Data Protection & Retention → Time Travel and Fail-safe and how they impact cost
- 🧩 Snowflake-specific advanced features → Secure Data Sharing and Zero-Copy Clone for data collaboration and environment cloning
✅ Practical Summary
- dbt defaults to using transient table to minimize cost
- Time Travel and Fail-safe offer data protection, but can increase storage costs
- Use
SNOWFLAKE.ACCOUNT_USAGE.TABLE_STORAGE_METRICSto monitor storage consumption - Full-refresh models recreate tables after each run and typically do not require extended retention features
- Permanent tables are recommended only for critical incremental models
- Snowflake provides advanced features like Secure Data Sharing and Zero-Copy Clone for collaboration and testing workflows
🗄️ Table types
Snowflake supports various table types. dbt typically uses TRANSIENT tables by default.
| Table Type | Data Protection & Retention (CDP) | Storage & Lifetime | Recommended Usage |
|---|---|---|---|
| Permanent Table | ✅ Fail-safe + Time Travel (up to 90 days) | Standard storage + Fail-safe cost | Critical, hard-to-reproduce datasets; Key incremental models |
| Transient Table (default in dbt) | ✅ Only Time Travel (up to 1 day) ❌ No Fail-safe | Standard storage only (no Fail-safe cost) | Most dbt models |
The full-refresh materialization recreates tables after each dbt run:
- No need to apply data retention features
- Snowflake does not retain historical data for these tables outside of Time Travel
- Can result in a measurable reduction of storage costs
Configuring transient table type: dbt docs
Note: Turning models to permanent tables is only logically reasonable for incremental models, and only after validating the business need for extended data recovery
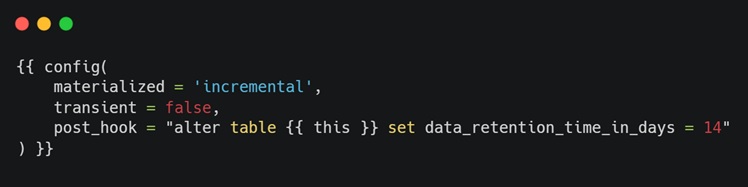
💡 Extended Time Travel: Use post-hooks to extend the default Time Travel period
🛡️ Storage-related features
Snowflake’s continuous data protection feature set:
- Available for permanent and transient tables
- Can be accessed and queried manually by the users
- Available for a maximum of 90 days* under an Enterprise license
- Only up to 1 day for transient tables
- Managed by Snowflake
- Only available for permanent tables
- Intended as a last resort
- Recovered through support ticket
- Non-configurable 7-day period
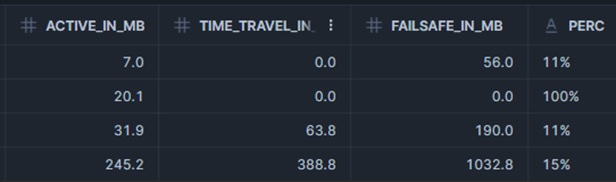
Note: While both provide powerful data protection, they can significantly increase storage costs depending on data change patterns. Frequent updates or deletes can multiply storage usage and it's recommended to monitor storage consumption regularly, especially for large and frequently changing tables.
Monitoring: SNOWFLAKE.ACCOUNT_USAGE.TABLE_STORAGE_METRICS
🧩 Snowflake-specific features
Snowflake offers several advanced platform-native features that can be valuable for specific use cases:
- Share data between Snowflake accounts without copying or moving data
- Enables real-time collaboration across business units or regions
- Available across most editions (advanced sharing options may require Enterprise license)
- Instantly create copies of databases, schemas or tables without duplicating storage
- Clones are metadata pointers and free until changes are made (copy-on-write model)
- Useful for testing, backups or branching environments (CI/CD)
⚙️ Compute
This section explains how Snowflake's compute layer works, how costs are calculated and how to optimize warehouse configurations for both performance and budget.
📋 Overview
- 📋 Overview → Introduction to Snowflake’s compute model, credit-based pricing and architecture basics
- ⚙️ Warehouses: Sizing and Threads → How to select the right warehouse size, configure threads and optimize for cost and performance
- 🗂️ Clustering and Micro-partitions → How clustering improves query performance and when to use it
- 🚀 Other Serverless Features → Optional compute accelerators
✅ Practical Summary
- Snowflake compute is billed based on warehouse size and active runtime (credits per second)
- Start with the smallest warehouse (X-Small) and scale up until query duration stops halving
- Match the number of dbt threads to warehouse size. Avoid over-threading, which can cause query queuing and slower performance
- Set auto-suspend to 60 seconds or less to minimize idle compute costs
- Use clustering selectively on large, frequently filtered tables, and monitor reclustering credit usage closely
- Advanced serverless features like Query Acceleration and Multi-Cluster Warehouses can improve performance, but should be used cautiously and only when fully understood
- Leverage special SQL features to improve efficiency
- Continuously monitor performance and credit usage using in-house or third-party solutions
📋 Overview
Snowflake's compute power is provided by virtual warehouses, which are clusters of cloud-based resources (CPU, memory and temporary storage) managed entirely by Snowflake.
When a query runs, it uses the compute resources of an active warehouse.
The underlying infrastructure (e.g., AWS EC2, Azure VM) is fully abstracted. Users do not interact with or manage it.
Snowflake compute follows a pay-as-you-go pricing model:
- You are billed based on warehouse size × active runtime
- Charges are calculated in credits that reflect actual cloud costs
💡 Compute charges are separate from storage costs. You pay only for the time warehouses are active
More details: Snowflake Pricing
⚙️ Warehouses: Sizing and Threads
Choosing the right warehouse size is critical for performance and cost efficiency.
Snowflake offers warehouses in T-shirt sizes (X-Small to 6X-Large), but exact hardware specifications are not public.
Best practices for warehouse sizing:
- Start with X-Small
- Increase size until query durations stop halving. At that point, you've likely found the cost-effective size
- There can be hidden costs and uptime, so avoid relying solely on runtime seconds and theory
- Be cautious when increasing to XL sizes, for instance
- Doubling warehouse size does not always halve query time
Made-up example for illustrating warehouse cost:
| Warehouse Size | Runtime | Credits per minute | Total Credits Consumed |
|---|---|---|---|
| Small (S) | 10 min | 1 | 10 |
| Medium (M) | 5 min | 2 | 10 |
In this example, running a query on a Small warehouse takes 10 minutes and consumes 1 credit per minute, resulting in 10 total credits.
Running the same query on a Medium warehouse takes only 5 minutes but consumes 2 credits per minute, leading to the same total credit usage, with less time.
In this case, using the Medium warehouse offers the same cost and better runtime!
Key takeaway: Larger warehouses can reduce runtime without increasing total cost, as long as the performance improvement is proportional to the size increase.
⚠ Applying this method to complex DAGs and pipelines can be more challenging than for single queries
Threads:
| Warehouse Size | Recommended threads |
| --- | --- |
| X-Small | 4–8 |
| Small | 8–16 |
| Medium or larger | 16+ (monitor for queuing) |
Increasing threads beyond a warehouse's concurrency limit causes query queuing, increasing total runtime and delaying DAG execution.
⚠ Over-threading (too many dbt threads) can cause query queuing and may slow down execution rather than speeding it up
📊 Use Snowflake's Query History view to check if your warehouse is fully utilized or if queries are queuing
Auto-suspend should be configured to 60 seconds or less to avoid paying for idle compute when the warehouse is not actively processing queries.
🗂️ Clustering and Micro-partitions
This section explains how clustering works in Snowflake, when to use it and how to apply it effectively to improve query performance while managing costs.
Micro-partitions:
- The fundamental unit of storage in Snowflake
- Typically between 50 and 500 megabytes, compressed and stored in a columnar format
- Each micro-partition includes metadata indexing, which helps optimize data scanning
- Micro-partitions are automatically created and managed when data is loaded into tables
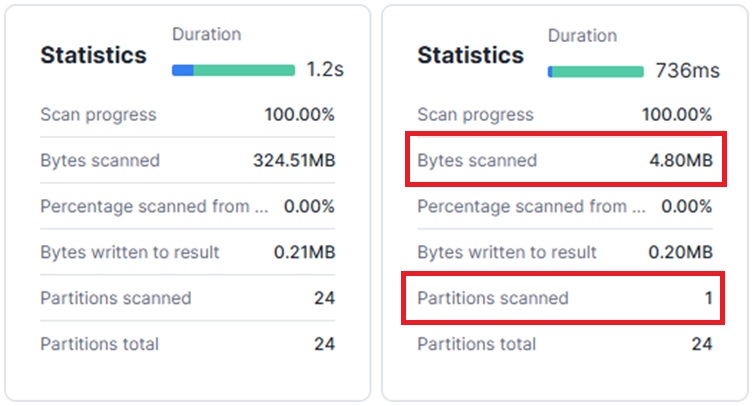
Clustering explained:
By default, data is distributed into micro-partitions based on load order. This can lead to misaligned partitions that don’t match common query filters, causing unnecessary partitions to be scanned.
Clustering improves this by organizing data at the metadata level so that queries can skip irrelevant partitions, reducing scan volume and improving performance.
📝 When/how to use clustering:
- Snowflake recommends using clustering only for large tables (multi-terabyte scale)
- Start with 1–2 large tables
- Monitor credit usage before applying widely
- Choose 3–4 clustering keys maximum
- The exact keys and method depend entirely on your query patterns
💡 Example of good keys: Dates, categories, status columns
🚫 Avoid: Unique IDs, free-text fields
🛠️ cluster_by in dbt
🔎 Automatic Clustering:
- Fully serverless → Snowflake manages when and how reclustering happens
- No user control over scheduling or frequency — Reclustering may occur at any time of day
- No upfront cost estimate — Costs depend on data volume, change frequency and can only be monitored after enabling
SNOWFLAKE.ACCOUNT_USAGE.AUTOMATIC_CLUSTERING_HISTORY- Monitor automatic clustering activity
📊 Example
🚀 Other Serverless Features
Snowflake offers several advanced compute-enhancing services (at additional cost), typically suited for complex workloads or specific use cases.
A few examples:
- Search Optimization Service (SOS) → Creates additional indexes to speed up queries with low-selectivity filters
- Query Acceleration Service (QAS) → Dynamically adds compute resources to accelerate complex queries
- Multi-cluster Warehouses → Automatically scales compute to meet high concurrency demands
⚠ These features can significantly improve performance, but they are optional and should be used only when you fully understand the workload and cost trade-offs. Start small, monitor the impact and scale up cautiously.
🧩 Special SQL Features
Snowflake offers several unique SQL functions that can simplify queries and improve efficiency.
A few examples:
QUALIFY→ Post-filter window functions directly in theSELECTstatementMAX_BY()→ Retrieve the maximum value along with another columnEXCLUDE→ Easily exclude columns from aSELECTwithout manually listing themHLL (HyperLogLog)→ Approximate distinct count, useful for very large datasets
🔍 Monitoring & Debugging
Tools and techniques to help analyze performance and control costs:
- dbt artifacts package → Analyze model runtime performance over time
- select.dev → Monitor Snowflake warehouse usage and query execution, including credit consumption
- Snowflake Query Profile → Snowflake's built-in visual execution graph for identifying query bottlenecks and inefficiencies
💡 Tip: Learning to read the Query Profile is an essential skill for any Analytics Engineer working with Snowflake
🔍 BigQuery
Python models
Python model execution on BigQuery
dbt uses the Dataproc service to execute python models as spark jobs on BigQuery data. Two submission methods for python models are cluster and serverless. The cluster method requires an existing and running spark cluster, serverless method creates a batch job based on the configuration.
The serverless method is easier to set up and operate and probably more cost effective than the cluster method but its startup time can be longer. The cluster method requires ceration of a cluster beforehand (with a configuration that enables connection to BigQuery) and you have to make sure that it is in running state when you run your python model. It will not stop automatically when the execution ends, which will increase costs.
dbt BigQuery setup
To configure your BigQuery connection profile for python model execution you can reference dbt's documentation here.
Serverless configuration
GCP's documentation on the Spark batch workload properties can be found here. You can set these in your profiles.yml under dataproc_batch.runtime_config.properties.
Using python packages
When submitting a serverless python model, a Dataproc batch job is created that uses a default container image for runtime. This default image has a number of python packages installed (eg. pySpark, pandas, NumPy ...). Documentation is unclear on the full list of preinstalled packages, in case you want to use a package that is not available, you can create a custom container image that contains your dependencies. Google's guide on building custom container images can be found here.
The image needs to be stored in GCP's Artifact Registry, and you need to reference the image in your dbt profile, setting dataproc_batch.runtime_config.container_image to the image url.
Cluster configuration
If you want to run your python models on a dedicated cluster, that cluster must be able to access BigQuery and the GCS storage bucket. This document show how to include the GCS connector and how to run a BigQuery connector script as an initialization action when creating the cluster.
Other useful resources
How to build dbt Python models in BigQuery?
🚗 Redshift
🧱 Databricks
Setup
Databricks
Databricks Platform:
Can run on AWS, Azure, GCP
- Running on Azure: Called Azure Databricks, provided by Microsoft
- Enterprise Edition only available on AWS
Pricing:
Generally AWS provides the most features, Azure is the most expensive option.
Community Edition:
Free community tool for exploration and learning. Runs on AWS. You don't have to pay neither for Databricks nor the the cloud resources that you use. Supports only limited size clusters, and not all features are available. eg.: Workflows, Databricks SQL, token generation
Unity Catalog
Enable unity catalog for better data management. Guide: https://docs.microsoft.com/en-us/azure/databricks/data-governance/unity-catalog/get-started
Unity catalog notebook: https://docs.microsoft.com/en-us/Azure/Databricks/_static/notebooks/unity-catalog-example-notebook.html
dbt
Vendor supprted adapter: https://github.com/databricks/dbt-databricks
setup guide: https://github.com/databricks/dbt-databricks/blob/main/docs/local-dev.md
You can run dbt models aganst Databricks SQL endpoints or Databricks clusters. Running against SQL endpoint is recommended
as they provide the latest SQL features and optimizations.
Databricks SQL endpoints (warehouses) is not supperted in the commuity edition and the Standard Edition. That leaves us with Premium or Enterprise Editions.
You can't create a PAT (personal access tokens) for community edition.
Default setup and learnings
-
Once databricks is set up correctly connecting dbt is quite straightforward.
-
The Databricks SQL warehouse is a Hive instance.
-
Tables are stored as parquet files on the DBFS (Databricks File System).
-
Clusters can access these files and tables through spark.
-
Won't work with dbt audit helper paackage. Some macros are not implemented
Loading data to databricks
There are several ways to load data to databricks. It is supported by most of the EL tools:
There are multiple other ways to get data into databricks.
You can upload files, create tables from data on DBFS that you can manipuléate through Spark jobs or use a Connector. Available Connectors depend on the cloud service that Dataricks is running on. For Azure Databricks these are:
- Azure Blob Storage
- Azure Data Lake Store
- Cassandra
- JDBC
- Kafka
- Redis
- Elasticsearch
Databricks has example notebooks that show how you can load from these sources into Databricks.
Connecting to Azure
When running Databricks on Azure several ways are provided to conviently load data that's residing on a Data Lake in Azure.
This is explained here: https://docs.microsoft.com/en-us/azure/databricks/data/data-sources/azure/azure-storage You'll need to create a key vault in Azure to store the keys that databricks uses to access Azure.
Administration
https://www.databricks.com/blog/2022/08/26/databricks-workspace-administration-best-practices-for-account-workspace-and-metastore-admins.html

| Account Admin | Metastore Admin | Workspace Admin | ||
|---|---|---|---|---|
| Workspace Management | - Create, Update, Delete workspaces - Can add other admins | Not Applicable | - Only Manages assets within a workspace | |
| User Management | - Create users, groups and service principals or use SCIM to sync data from IDPs. - Entitle Principals to Workspaces with the Permission Assignment API | Not Applicable | - We recommend use of the UC for central governance of all your data assets(securables). Identity Federation will be On for any workspace linked to a Unity Catalog (UC) Metastore. - For workspaces enabled on Identity Federation, setup SCIM at the Account Level for all Principals and stop SCIM at the Workspace Level. - For non-UC Workspaces, you can SCIM at the workspace level (but these users will also be promoted to account level identities). - Groups created at workspace level will be considered "local" workspace-level groups and will not have access to Unity Catalog | |
| Data Access and Management | - Create Metastore(s) - Link Workspace(s) to Metatore - Transfer ownership of metastore to Metastore Admin/group | With Unity Catalog: -Manage privileges on all the securables (catalog, schema, tables, views) of the metastore - GRANT (Delegate) Access to Catalog, Schema(Database), Table, View, External Locations and Storage Credentials to Data Stewards/Owners | - Today with Hive-metastore(s), customers use a variety of constructs to protect data access, such as Instance Profiles on AWS, Service Principals in Azure, Table ACLs, Credential Passthrough, among others. -With Unity Catalog, this is defined at the account level and ANSI GRANTS will be used to ACL all securables | |
| Cluster Management | Not Applicable | Not Applicable | - Create clusters for various personas/sizes for DE/ML/SQL personas for S/M/L workloads - Remove allow-cluster-create entitlement from default users group. - Create Cluster Policies, grant access to policies to appropriate groups - Give Can_Use entitlement to groups for SQL Warehouses | |
| Workflow Management | Not Applicable | Not Applicable | - Ensure job/DLT/all-purpose cluster policies exist and groups have access to them - Pre-create app-purpose clusters that users can restart | |
| Budget Management | - Set up budgets per workspace/sku/cluster tags - Monitor Usage by tags in the Accounts Console (roadmap) - Billable usage system table to query via DBSQL (roadmap) | Not Applicable | Not Applicable | |
| Optimize / Tune | Not Applicable | Not Applicable | - Maximize Compute; Use latest DBR; Use Photon - Work alongside Line Of Business/Center Of Excellence teams to follow best practices and optimizations to make the most of the infrastructure investment |
Partner connect
Databricks offers easy integration with some of its partners
Working with dbt
SQL Warehouses in Databricks are configured to shut down after being idle for some time. If you want to run your models against a warehouse that is not running at the moment you'll have to wait until it starts. This is triggered automatically, however it takes some time as Databricks needs to spin up cloud instances.
Chossing the right cluster

Develop the handbook locally
This project uses mdBook to create the deployed version of the handbook.
To install mdBook on your device please refer to this installation guide.
Once mdBook is installed on your computer, you can navigate to the project's root folder and run
mdbook build --open
to build the handbook and open it in your deafult browser.
During development you can use
mdbook serve
command which will launch an HTTP server and serve the content at localhost:3000. It watches the book’s src directory for changes, rebuilding the book and refreshing clients for each change.
For more information you can refer to the mdBook documentation.
Contribute to this repo
If you feel like you can add anything useful — whether it’s a new feature, a bug fix, or an improvement — feel free to contribute! Just fork the repo, make your changes, and open a pull request. Every bit of help is appreciated! 🚀